
What a ComfyUI Workflow Does in Short Drama Production
In standard web interfaces, image generation functions like a black box: you enter a prompt, select a model, and click generate. ComfyUI breaks that process into a modular node graph. Every stage of execution—loading weights, encoding text, calculating noise in KSamplers, and decoding frames through a VAE—operates as an independent, visible block.
For vertical short drama creators, this modularity solves character and lighting drift across sequential scenes. Instead of generating isolated images, you can construct a dedicated pipeline that couples facial reference conditioning with camera framing controls and motion modules.
Once you build a graph that renders a character reliably in 9:16 vertical framing, that workflow becomes your production template. You keep the node architecture locked, update scene prompts or reference frames, and generate consistent shots across your entire storyboard.
- Direct pipeline control: Inspect every generation stage instead of guessing why a prompt produced unexpected artifacts.
- Repeatable character styling: Combine reference inputs, prompt conditioning, and motion modules into a reusable shot template.
- Separation of tasks: Build the underlying rendering pipeline once, then focus on scripting and framing individual scene beats.
Exporting API JSON vs. Standard Save: The Technical Difference
Clicking 'Save' in ComfyUI exports a file meant for human editing in a browser. This standard JSON stores canvas positions, zoom levels, wire curves, and node colors. While the visual editor needs this information to redraw the interface, the underlying execution server ignores it completely.
If you send a standard layout JSON to the ComfyUI API endpoint, the task queue rejects it. The backend requires API JSON format: a flattened dictionary where each key is an integer node ID and each value contains only the node class type and functional input links. Interface layout data is completely removed.
In newer interfaces, export this format by navigating to the top menu: 'Workflow' (named 'File' in some versions) -> 'Export (API)'. If the option is not visible in the menu, open Settings and enable Dev Mode. Comparing the two files in a text editor reveals the contrast: the standard file contains UI geometry, while the API JSON contains only the execution graph needed to run your shot.
Export via Top Menu
In newer versions, click the top menu and select 'Workflow' (named 'File' in some versions) -> 'Export (API)'.
Enable Dev Mode if Needed
If the export option is not visible in the menu, open ComfyUI settings via the gear icon and enable Dev Mode.
Verify Graph Structure
Inspect the exported JSON file in an editor to confirm top-level keys are numbered node IDs containing 'inputs' and 'class_type' fields.
Local Workstation, Studio LAN, or ComfyUI Cloud: Choosing Your Setup
Rendering vertical drama shots requires substantial graphics memory, especially when running multi-second video latents or spatial conditioning. Creators generally deploy their workflows across three hosting environments, each with clear operational trade-offs.
Running ComfyUI locally on your primary workstation costs nothing in ongoing server fees, and all checkpoints remain on your local drive. However, heavy video diffusion passes consume your graphics card entirely, making timeline editing or video playback sluggish on that machine during generation.
A studio LAN rig offloads rendering to a secondary computer on your local network. Your editing laptop stays cool and responsive while the dedicated tower processes queue tasks. Setup requires passing the '--listen' flag to ComfyUI at startup and connecting via the host machine's local IP address.
A ComfyUI cloud server rents remote high-memory GPUs on demand. Cloud hosting lets you run demanding video diffusion models that exceed consumer hardware limits without an upfront purchase. However, cloud setups incur rental fees, require uploading large checkpoints to remote storage, and demand careful session management.
- Local Workstation: Zero rental cost and direct local asset access, but ties up your primary GPU during heavy rendering sessions.
- Studio LAN Rig: Keeps your daily editing laptop responsive while a dedicated desktop handles background batch jobs.
- ComfyUI Cloud: Provides high-memory GPUs without hardware purchases, but introduces recurring compute charges.
Four Common Pitfalls in ComfyUI Short Drama Production
Sequential short drama production introduces technical hurdles that rarely appear in single-image generation. When characters move between an establishing wide shot and an emotional close-up, small pipeline missteps disrupt visual coherence.
The first pitfall is unmanaged seed randomization. Leaving the KSampler seed on random causes facial details, clothing textures, and lighting to shift with every test render. When refining camera framing or scene prompts, lock the seed to a fixed integer. Only randomize seeds when exploring fresh visual concepts.
The second pitfall is aspect ratio mismatch on reference inputs. Short dramas rely on 9:16 vertical video framing (such as 720x1280 or 810x1440). If you pass a 16:9 landscape reference into an unscaled conditioning node, the model often squashes facial proportions or crops the actor awkwardly. Always crop reference frames to match the target canvas aspect ratio before execution.
The third pitfall is VRAM exhaustion during video synthesis. Stacking high frame counts with multiple conditioning passes can trigger CUDA out-of-memory errors on consumer GPUs. Video workflows typically require substantial graphics memory. To maintain stability, use tiled VAE decoders, generate baseline video clips at moderate resolutions before upscaling, and avoid excessive frame lengths in a single pass.
The fourth pitfall is disorganized output file naming. By default, ComfyUI automatically increments numbers (such as ComfyUI_00001_) without overwriting older files. However, these default filenames give no indication of which episode or shot they belong to, making post-production organization difficult. It is recommended to configure save nodes with prefixes containing episode and scene numbers—such as 'Episode01_Scene02_'—to keep generated takes organized during assembly.
Connecting Your Self-Hosted Setup with DramaCanvas ComfyUI Bridge
Switching between a ComfyUI browser tab and your script notes interrupts creative rhythm when assembling dozens of scene beats. DramaCanvas includes a built-in ComfyUI Bridge plugin that lets you trigger your self-hosted setups directly from storyboard canvas cards.
The Bridge client runs on the computer with network access to your ComfyUI server. The local client actively initiates an outbound connection to the cloud to retrieve tasks, requiring no public port mapping or NAT traversal. Each DramaCanvas account communicates exclusively with its own registered Bridge instances.
DramaCanvas provides the Bridge as a standalone application for Windows, and as a native program for Linux with multiple architectures available (cloud servers typically use x64). It requires no Node.js runtime, no package managers, and no code compilation. You simply download the binary, execute the startup command from your settings panel, and let it scan your workflows.
Enable Plugin in DramaCanvas
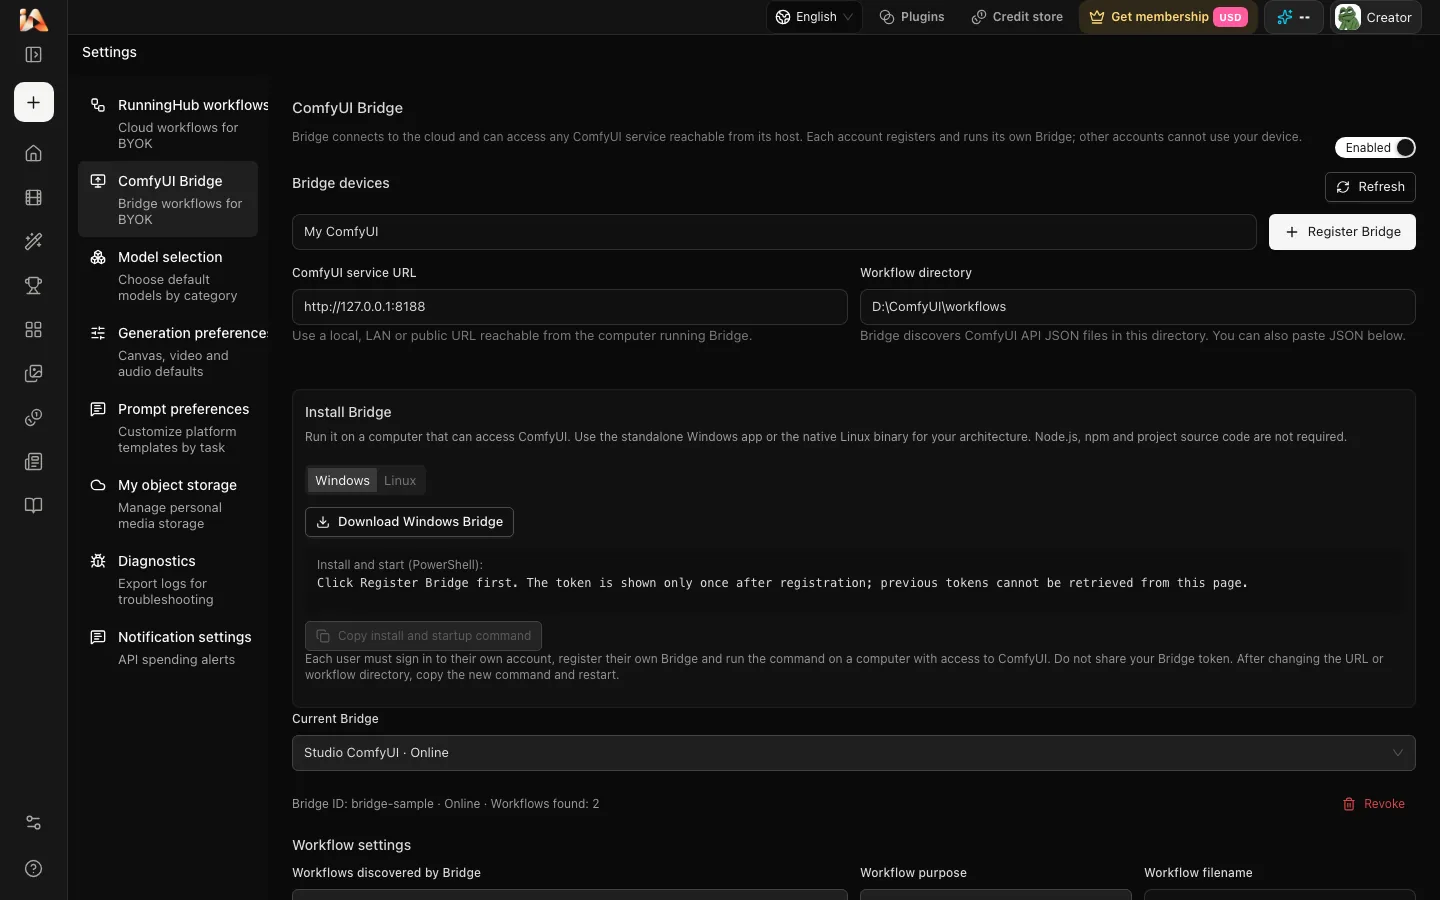
Navigate to the Plugins page in DramaCanvas, enable the built-in ComfyUI Bridge plugin, then open 'ComfyUI Bridge' under your account Settings (login required).
Register Your Bridge Instance
Enter an instance name (such as 'Office ComfyUI'), specify your ComfyUI service URL (e.g., http://127.0.0.1:8188 or a local network IP), and set your local workflow directory path. Click 'Register Bridge'.
Launch the Bridge Client
Download the application for your operating system (a standalone program for Windows, or the appropriate native architecture for Linux, typically x64 for cloud servers). Copy the startup command from DramaCanvas and execute it in your terminal to connect to the cloud and retrieve tasks.
Discover and Map Workflow Fields
Once the Bridge appears online, DramaCanvas automatically scans the exported API JSON files in your workflow directory. Select your workflow category (Image, Video, or Audio), pick your file, map input fields to your scene parameters, and save the configuration.
Running Workflows Inside Canvas Nodes
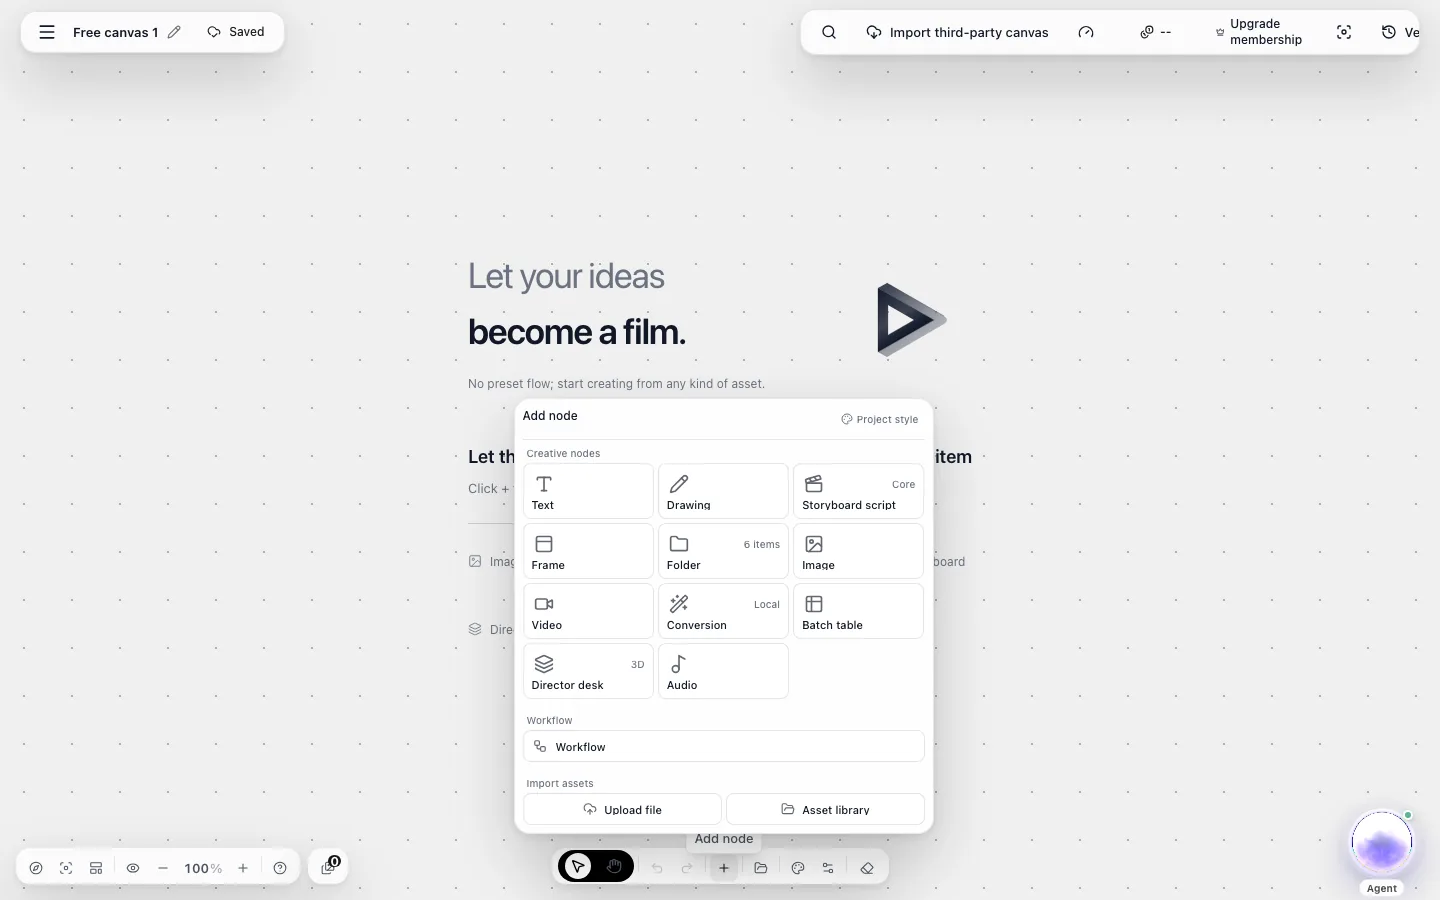
After saving your field mappings, you can add a workflow node to the storyboard canvas from the 'Workflow' category in the add node menu (shared by RunningHub and ComfyUI). If you cannot see this entry, switch to 'Professional mode' in the top bar of the canvas. Then, choose your registered ComfyUI configuration from the list.
Parameter fields on the node are populated from your saved workflow configuration, and the seed can be randomized by clicking the dice icon. When reference images, reference videos, reference audio, or masks are connected to the node, they are automatically filled into the workflow's corresponding inputs according to your field configuration.
Clicking run sends the execution payload across your Bridge to your designated GPU host. Once processing finishes, the generated video clip or image displays directly inside the node card on your canvas. If a shot drifts or requires alternate lighting, you can tweak parameters or swap connected references directly on the canvas and re-render without modifying the underlying node graph.
- Canvas workflow access: Add workflow nodes from 'Workflow' in the node menu, switching to Professional mode if the option is not visible.
- Automatic reference mapping: Connect reference images, reference videos, reference audio, or masks directly to the node to automatically fill the corresponding workflow inputs.
- Targeted revisions: Adjust parameters directly on the canvas node or click the dice icon to randomize seeds for new takes without modifying the underlying graph.
Token Hygiene and Local Network Security
Linking private hardware to web applications requires careful credential handling. DramaCanvas uses single-use tokens to authenticate the connection between your Bridge client and your user account.
When you register a Bridge in your settings panel, the system generates an authentication token that appears on your screen exactly once. DramaCanvas does not display this token again after the registration window closes. Copy the installation command immediately into your terminal or store the token in a secure password manager.
Never share startup commands or tokens in public forums or team chats. If a token is compromised or you retire a temporary rendering machine, open the ComfyUI Bridge settings page in DramaCanvas and click revoke. Revocation takes effect immediately, invalidating the token and disconnecting the client.
If you change your ComfyUI port or relocate your workflow directory on your host machine, update the connection details in DramaCanvas, copy the updated command, and restart the Bridge client process.
Frequently Asked Questions
What is a workflow in ComfyUI and how does it differ from a prompt box?
A ComfyUI workflow is a modular node graph that maps the computational pipeline of generative models—from checkpoint loading and conditioning to latent sampling and decoding. Unlike fixed prompt boxes, ComfyUI lets you inspect, rewire, and customize each stage of image and video synthesis. This flexibility helps creators build repeatable pipelines for multi-shot narrative continuity.
How do I use reference images in ComfyUI for short drama shots?
Pass character reference images into conditioning nodes such as IP-Adapter or ControlNet before running the sampling step. Always match your reference image aspect ratio to your output format—such as 9:16 for vertical short dramas—to prevent unwanted distortion or facial stretching. If facial features drift across takes, adjust prompt emphasis, refine reference weights, or test an alternate clean portrait.
Can ComfyUI be self-hosted, and what hardware is needed for video production?
Yes, ComfyUI can be self-hosted on your own hardware without external server dependencies. While static image generation can run on standard graphics cards, video workflows typically require substantial graphics memory to prevent out-of-memory errors during latent decoding.
How to run ComfyUI on cloud servers and what does it typically cost?
You can run ComfyUI on cloud GPU providers by deploying an instance with a graphics card, setting up ComfyUI with your required models, and launching the server with listening flags enabled. Rental pricing depends on the provider and the selected GPU specifications, and you pay the cloud provider directly based on their billing rates.
Is cloud ComfyUI free, and does DramaCanvas charge fees for running workflows?
DramaCanvas does not deduct credits for running workflows through ComfyUI Bridge or RunningHub. RunningHub charges separately according to its own pricing rules. For ComfyUI, whether you run it on your own local computer or rent a cloud server, you cover your own hardware and hosting costs.
Why does my exported API JSON fail or show missing inputs when executed externally?
This issue typically occurs if the workflow was saved using standard 'Save' rather than 'Export (API)' (found in the top menu under Workflow, or File in some versions; if missing from the menu, enable Dev Mode in Settings), leaving behind visual UI data that API backends cannot process. It can also happen if custom nodes referenced in the JSON are missing from your ComfyUI setup or if input fields were renamed. Check your ComfyUI terminal console to identify missing node dependencies.